Planning a photoshoot isn’t just about showing up with a camera and hoping for the best. It’s about controlling light, timing, emotion, and movement - all before the shutter even clicks. Whether you’re shooting a portrait, a product, or a street scene, the difference between a good photo and a great one often comes down to what happened before you pressed the button. Many people skip the prep work because it feels boring, but the truth is, the best photos are made in the planning stage, not the editing suite.
If you’ve ever scrolled through Instagram and wondered how someone got that perfect golden-hour shot with no chaos in the background, they didn’t get lucky. They planned. And if you’re looking for inspiration beyond the usual setups, you might even find yourself browsing eu escort london for ideas on posing, mood, and natural chemistry - yes, even that kind of content can teach you how to direct people to look real, not staged.
Define Your Goal Before You Do Anything Else
What’s the point of this shoot? That’s the first question you need to answer. Are you building a portfolio? Selling products? Documenting a personal story? Creating content for social media? Each goal changes everything - the location, the lighting, the wardrobe, even the time of day.
For example, if you’re shooting fashion for Instagram, you need bold colors, clean backgrounds, and dynamic poses. If you’re doing a family portrait, you want soft light, natural expressions, and a setting that feels like home. A product shoot demands controlled lighting and a neutral backdrop. No two goals are the same, and trying to force one style onto another will waste your time and ruin your shots.
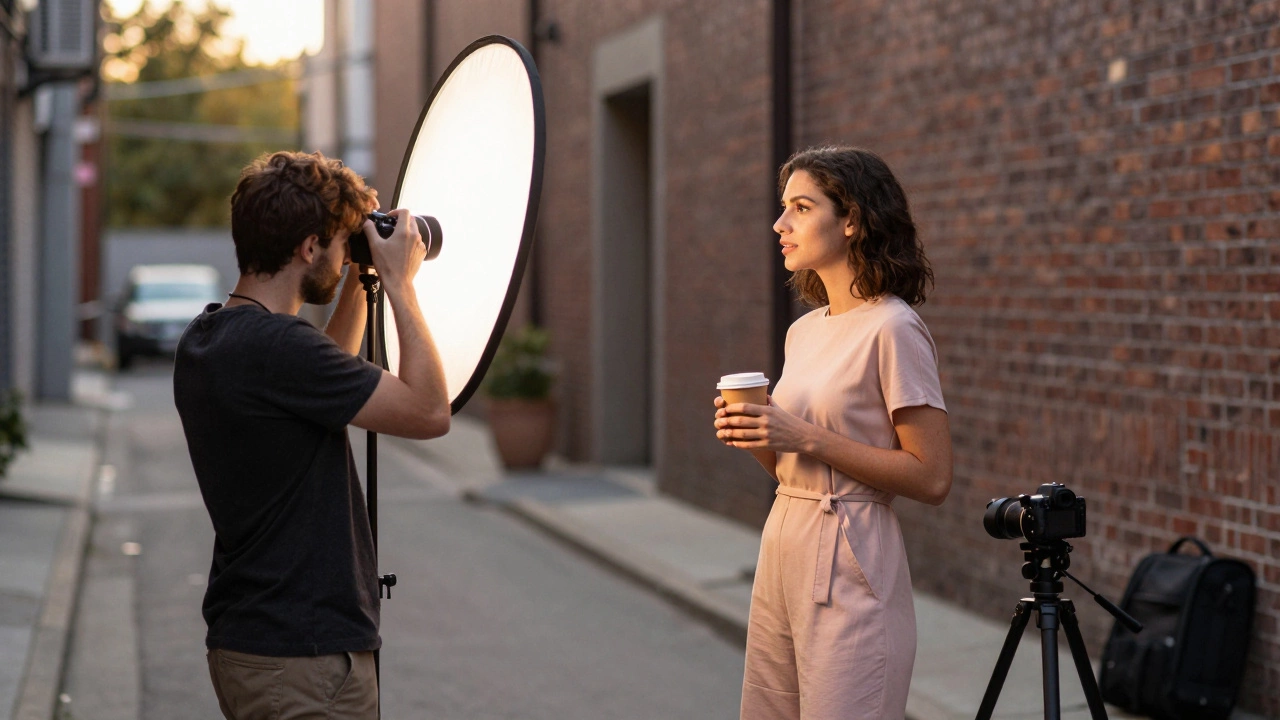
Choose the Right Location - It’s Not Just a Backdrop
The location isn’t just where you take pictures. It’s part of the story. A busy street can add energy. An empty warehouse can create mystery. A sunlit kitchen can feel warm and intimate. But you can’t just pick a place because it looks nice on Google Maps. You need to visit it first - ideally at the same time of day you plan to shoot.
Check for distractions: power lines, trash cans, cars parked awkwardly, or people walking through your frame. Look at how the light hits the ground. Does it create harsh shadows? Is there a reflective surface that will blow out your subject’s face? Bring a small tripod or even your phone to test angles. Take a few test shots. See how the light changes over 30 minutes. That’s how you avoid showing up on shoot day only to realize the sun is in the wrong spot.
Plan Your Lighting - Natural or Artificial?
Lighting makes or breaks a photo. And no, you don’t need expensive gear to get great light. Natural light is often better than anything you can buy. The golden hour - the hour after sunrise or before sunset - gives you soft, warm, directional light that flatters skin and adds depth. Blue hour, just before sunrise or after sunset, gives you cool, even tones perfect for moody shots.
If you’re shooting indoors or at night, you’ll need artificial light. A single softbox or even a white sheet diffusing a lamp can work wonders. Avoid harsh overhead lights or flash directly on your subject - they flatten everything and create unflattering shadows. Bounce your light off a wall or ceiling if you can. Use reflectors (even a piece of white foam board) to fill in shadows. The goal is to make light feel natural, not like a studio lamp was just turned on.
Build a Shot List - No More Guessing on Set
Before the day of the shoot, write down every shot you want. Not just “portrait” or “product shot.” Be specific: “Subject looking left, slight smile, golden hour behind them, blurred trees in background.” Include angles, poses, props, and lighting setups. This isn’t just for you - if you’re working with a model, stylist, or assistant, they need to know what you’re after.
Organize your list by location or lighting setup. Group similar shots together so you don’t waste time moving back and forth. If you’re shooting three different outfits, shoot them all in the same spot under the same light before switching locations. That saves hours.
And here’s a tip: always include at least one “wildcard” shot - something unplanned, creative, or silly. Some of the best images come from moments you didn’t plan for.

Wardrobe, Props, and Styling - Details Matter
What your subject wears can make or break the photo. Avoid logos, busy patterns, or colors that clash with the background. Solid tones usually work best. If you’re shooting outdoors, avoid white if the background is bright sand or snow - it can blow out. Dark tones work well in forests. Pastels pop against brick walls.
Props should support the story, not distract from it. A coffee cup in a morning shoot? Great. A giant stuffed bear in a corporate headshot? Not so much. Keep it simple. And always bring extras - an extra shirt, a hairbrush, tape to fix a ripped seam, wet wipes for shiny faces.
For makeup and hair, consider the lighting. Harsh sun can highlight sweat and shine, so matte finishes are better. Indoor lighting can be warmer, so cooler tones in makeup might balance it out. If you’re unsure, do a quick test shoot with your phone before the real thing.
Coordinate With Your Team - Even If It’s Just One Other Person
Even if you’re shooting solo, you’re still managing a team: you’re the photographer, director, stylist, and assistant. But if you have help, communication is everything. Have a quick call or text before the shoot. Confirm the time, location, what each person is responsible for, and what the end goal is.
Assign roles: one person handles the camera, another manages the subject’s pose or wardrobe, someone else brings the reflector or holds the light. If you’re working with a model, give them feedback early. Say something like, “I love that look - can you tilt your head just a little more?” instead of “That’s not right.” Positive direction gets better results than criticism.
And if you’re shooting in a public place, be respectful. Don’t block sidewalks. Ask permission if you’re using private property. People hate being surprised by a camera. A quick “Hi, we’re doing a photo shoot - mind if we use this spot for 20 minutes?” goes a long way.
Prepare Your Gear - And Then Prepare for It to Fail
Check your gear the night before. Batteries charged? Memory cards formatted and empty? Lenses clean? Tripod tight? Remote shutter? Backup battery? Backup card? Don’t assume anything works until you’ve tested it.
Bring more than you think you’ll need. Two batteries. Three memory cards. A lens cloth. A small towel for rain or sweat. A power bank for your phone. Even a plastic bag to protect your gear if it rains. Weather changes fast. So do plans.
And here’s something most beginners forget: bring a chair. You’ll be standing for hours. Your back will thank you. And if you’re shooting a model, bring them water and snacks. A tired, thirsty subject won’t give you their best.

Shoot More Than You Think You Need
Don’t be stingy with your shutter button. Take 10 shots of the same pose. Change the angle. Change the expression. Move the subject a few inches. You can delete later - you can’t recreate the moment if you missed it.
Shoot in RAW format if you can. It gives you way more flexibility in editing. Even if you don’t plan to edit much, RAW files hold more detail in shadows and highlights. JPEGs can’t recover blown-out skies or dark faces like RAW can.
And don’t just shoot the main subject. Capture details: hands holding a cup, fabric wrinkles, light hitting an eye, a shoe scuff on the ground. These are the shots that make albums feel alive.
Review and Edit - But Don’t Overdo It
After the shoot, take a break. Come back the next day to edit. You’ll see things you missed. Delete the blurry ones, the awkward expressions, the duplicates. Keep the best 3-5 per pose. Then pick your top 1-2.
Editing isn’t about making people look perfect. It’s about making them look real. Fix exposure, remove a distracting element, smooth a skin tone slightly. Don’t turn a person into a cartoon. Don’t use filters that make everything look like Instagram 2015. Keep it clean. Keep it honest.
If you’re sharing online, crop for the platform. Instagram square? Portrait? Story? Each has different dimensions. Don’t just resize - crop intentionally.
Learn From Every Shoot - Even the Bad Ones
No shoot is ever wasted. Even if the lighting failed, the model was late, or the rain ruined everything, you learned something. Write it down. What went wrong? What worked? What would you do differently next time?
Keep a simple notebook or digital file. Over time, you’ll build a personal guide to your own style. You’ll start recognizing patterns: you love natural light. You hate cluttered backgrounds. You always shoot low angles. That’s your voice. And that’s what makes your photos stand out.
And if you ever feel stuck, look at work from other photographers - not to copy, but to understand why certain shots work. Pay attention to how light falls, how space is used, how emotion is captured. You don’t need to be a professional to learn from the best.
Planning a photoshoot isn’t about perfection. It’s about preparation. The more you plan, the more freedom you have to be creative when it counts. And when you get that one shot - the one that makes you pause and say, “I made that” - you’ll know every minute of prep was worth it.
By the way, if you’re ever looking for inspiration in capturing natural chemistry or candid moments, you might stumble across eurogirlsescort london - not for the content itself, but for how lighting, posture, and emotion are used to create a sense of intimacy without posing. It’s a reminder that the best photos feel real, not staged.
And if you’re ever stuck on how to direct someone to look relaxed in front of the camera, try watching how people interact in candid settings - like the kind of scenes you might find in elite escort london content. Again, not for the context, but for the subtle cues: the tilt of a head, the way eyes follow the light, the slight smile that comes before a laugh. Those are the details that turn a photo into a moment.